Good morning.
How was your night?
Today, I want to teach you how to add and play audio clips in a presentation using MS Powerpoint. Most times, you would have been wondering how sounds were added to some of the presentations you have seen. Don’t worry, you can as well do that. Just try to go through this teaching carefully.
You can add audio, such as music, narration, sound bites, and more to your presentations to add emphasis.
In this teaching, you will learn the following:
Overview of adding audio clips
Preview an audio clip before you add it to a slide
Preview an audio clip on a slide
Set the playback options for an audio clip
Overview of adding audio clips
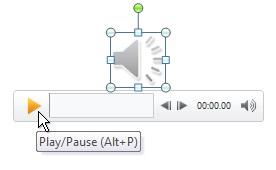
When you insert an audio clip on a slide, an icon appears that represents the audio file. While you give your presentation, you can set the audio clip to play automatically when the slide displays, to start when you click the mouse, or to play across all slides in the presentation. You can even play media continuously in a loop until you stop it.
You can add an audio clip from files on your computer, a network, or the Clip Art task pane. You can also record your own audio to add to a presentation or use music from a CD.
You can preview an audio clip and you can hide the audio icon during a slide show.
How to Add an Audio Clip
To prevent playback issues, you can embed your audio clips in your presentation.
- Click the slide to which you want to add an audio clip.
- On the Insert tab, in the Media group, click Audio.
- Do one of the following:
- Click Audio from File, locate the folder that contains the file, and then double-click the file that you want to add.
- Click Clip Art Audio, locate the audio clip that you want in the Clip Art task pane, and then click to add it to the slide.
How to Preview an audio clip before you add it to a slide
You can preview a clip before adding it to your presentation.
- In the Clip Art task pane, in the box that displays the available clips, move your mouse pointer over the clip’s thumbnail.
- Click the down arrow, and then click Preview/Properties.
- In the Preview/Properties dialog box, click Play.
Press Play to preview the audio clip in the Preview/Properties dialog box

Preview an audio clip on a slide
- On the slide, select the audio clip icon .
- Below the icon, click Play.

Set the playback options for an audio clip
- On the slide, select the audio clip icon .
- Under Audio Tools, on the Playback tab, in the Audio Options group, do one of the following:
- To start the audio clip automatically when you show the slide, in the Start list, click Automatically.
- To manually start the audio clip when you click it on the slide, in the Start list, click On Click.
- To play an audio clip as you click through the slides in your presentation, in the Start list, click Play across slides.
- To play an audio clip continuously until you stop it, in select the Loop until Stopped check box.
Note When you loop a sound, it plays continuously until you advance to the next slide.
Note If you add multiple audio clips, they will appear on top of each other, and each will play in the order in which they were added. If you want each audio clip to start when you click it, drag the audio clip icons off of each other after you insert them.
Hide the Audio Clip Icon
Important Use this option only if you set the audio clip to play automatically, or if you created some other kind of control, such as a trigger, to click to play the clip. (A trigger is something on your slide, such as a picture, shape, button, paragraph of text, or text box, that can set off an action when you click it.) Note that the sound icon is always visible unless you drag it off the slide.
- Click the audio clip icon .
- Under Audio Tools, on the Playback tab, in the Audio Options group, select the Hide During Show check box.
