You might have to use data from various sources for analysis. In Excel, you can import data from different data sources. Some of the data sources are as follows −
- Microsoft Access Database
- Web Page
- Text File
- SQL Server Table
- SQL Server Analysis Cube
- XML File
You can import any number of tables simultaneously from a database.
Importing Data from Microsoft Access Database
We will learn how to import data from MS Access database. Follow the steps given below −
Step 1 − Open a new blank workbook in Excel.
Step 2 − Click the DATA tab on the Ribbon.
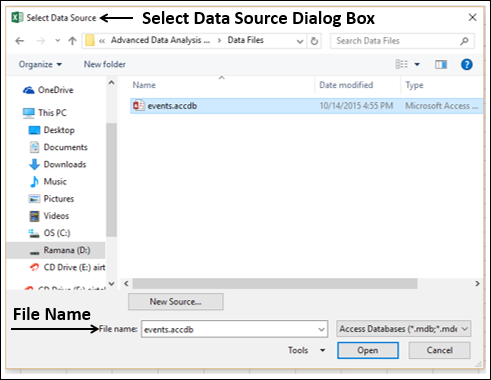
Step 3 − Click From Access in the Get External Data group. The Select Data Source dialog box appears.

Step 4 − Select the Access database file that you want to import. Access database files will have the extension .accdb.
The Select Table dialog box appears displaying the tables found in the Access database. You can either import all the tables in the database at once or import only the selected tables based on your data analysis needs.

Step 5 − Select the Enable selection of multiple tables box and select all the tables.

Step 6 − Click OK. The Import Data dialog box appears.

As you observe, you have the following options to view the data you are importing in your workbook −
- Table
- PivotTable Report
- PivotChart
- Power View Report
You also have an option – only create connection. Further, PivotTable Report is selected by default.
Excel also gives you the options to put the data in your workbook −
- Existing worksheet
- New worksheet
You will find another check box that is selected and disabled – Add this data to the Data Model. Whenever you import data tables into your workbook, they are automatically added to the Data Model in your workbook. You will learn more about the Data Model in later chapters.
You can try each one of the options to view the data you are importing, and check how the data appears in your workbook −
- If you select Table, Existing worksheet option gets disabled, New worksheet option gets selected and Excel creates as many worksheets as the number of tables you are importing from the database. The Excel tables appear in these worksheets.
- If you select PivotTable Report, Excel imports the tables into the workbook and creates an empty PivotTable for analyzing the data in the imported tables. You have an option to create the PivotTable in an existing worksheet or a new worksheet.
Excel tables for the imported data tables will not appear in the workbook. However, you will find all the data tables in the PivotTable fields list, along with the fields in each table.
- If you select PivotChart, Excel imports the tables into the workbook and creates an empty PivotChart for displaying the data in the imported tables. You have an option to create the PivotChart in an existing worksheet or a new worksheet.
Excel tables for the imported data tables will not appear in the workbook. However, you will find all the data tables in the PivotChart fields list, along with the fields in each table.
- If you select Power View Report, Excel imports the tables into the workbook and creates a Power View Report in a new worksheet. You will learn how to use Power View Reports for analyzing data in later chapters.
Excel tables for the imported data tables will not appear in the workbook. However, you will find all the data tables in the Power View Report fields list, along with the fields in each table.
- If you select the option – Only Create Connection, a data connection will be established between the database and your workbook. No tables or reports appear in the workbook. However, the imported tables are added to the Data Model in your workbook by default.
You need to choose any of these options, based on your intent of importing data for data analysis. As you observed above, irrespective of the option you have chosen, the data is imported and added to the Data Model in your workbook.
Importing Data from a Web Page
Sometimes, you might have to use the data that is refreshed on a web site. You can import data from a table on a website into Excel.
Step 1 − Open a new blank workbook in Excel.
Step 2 − Click the DATA tab on the Ribbon.
Step 3 − Click From Web in the Get External Data group. The New Web Query dialog box appears.

Step 4 − Enter the URL of the web site from where you want to import data, in the box next to Address and click Go.

Step 5 − The data on the website appears. There will be yellow arrow icons next to the table data that can be imported.

Step 6 − Click the yellow icons to select the data you want to import. This turns the yellow icons to green boxes with a checkmark as shown in the following screen shot.

Step 7 − Click the Import button after you have selected what you want.

The Import Data dialog box appears.

Step 8 − Specify where you want to put the data and click Ok.
Step 9 − Arrange the data for further analysis and/or presentation.