
Good Afternoon.
How was your weekend?
Today, I will be teaching you how you how to automatically save and recover your Microsoft Office files.
At first, I will like to establish this fact: the AutoRecover feature is not a substitute for manually saving your work by clicking Save . Regularly saving the file is the surest way to preserve the work that you have done, but sometimes a Microsoft Office program closes before you can save changes to a file that you are working on. Some possible causes include the following:
- A power outage occurs.
- Your system is made unstable by another program.
- Something goes wrong with the Microsoft Office program itself.
- You close your file without saving it.
Although you cannot always prevent problems such as these, you can take steps to protect your work when an Office program closes abnormally.
Keyboard shortcut to save a file is: press CTRL+S.
Now, let’s go fully into what you need to do so as to automatically save and recover your Microsoft Office files.
It will not make sense if I do not explain to you how AutoRecover works. So, let’s quickly look in this aspect.
How AutoRecover works
The AutoRecover option can help you avoid losing work in two ways:
- Your data is automatically saved if you enable AutoRecover, your file is automatically saved as often as you want. Therefore, if you have been working for a long time but forget to save a file or if your power goes out, the file you have been working on contains all or at least some of the work you have done since you last saved it.
- Your program state is automatically saved. An additional benefit to enabling AutoRecover is that some aspects of the state of the program are recovered when the program is restarted after it closed abnormally.
For example: you are working on several Excel workbooks at the same time. Each file is open in a different window, with specific data visible in each window. In one of the workbooks, a cell is selected to help you keep track of which rows you already reviewed, and then Excel crashes. When you restart Excel, it opens the workbooks again and restores the windows to the way they were before Excel crashed, including keeping the information in the tracking cell.
Although not every aspect of your program’s state can be recovered, the Recovery feature can frequently help you return to the previous state more quickly.
Now that you have idea of how AutoRecover works. Let me explain to you how to enable and adjust AutoRecover and AutoSave. Without enabling them, they cannot work. Do you get that?
Enable and adjust AutoRecover and AutoSave
- Click the File
 b
- Under Help, click Options.
- Click Save.
- Select the Save AutoRecover information every x minutes check box.
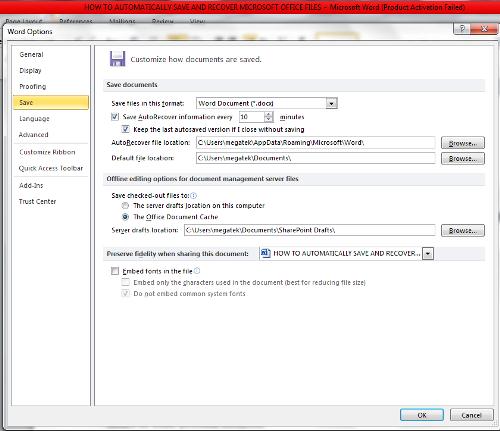
- In the minutes field, specify how often you want the program to save your data and the program state.
TipThe amount of new information that the recovered file contains depends on how frequently a Microsoft Office program saves the recovery file. For example, if the recovery file is saved only every 15 minutes, your recovered file won’t contain your last 14 minutes of work before the power failure or other problem occurred.
- You can also change the location (specified in the AutoRecover file location box) where the program automatically saves a version of files you work on.
Enable Recover unsaved versions
- Click the File
- Under Help, click Options.
- Click Save.
- Select the Keep the last autosaved version if I close without saving check box.
Note This feature only applies to Word 2010, Excel 2010 and PowerPoint 2010.
Should you have any question, do not hesitate to post them.
Thank you.