Good Morning.
I will be teaching you how to filter information in tables using MS Access.
Information are the processed data of yours which you entered into the computer system. In MS Access, you enter them into tables. Then, how do you view them? That is the main purpose of this article.
The steps to follow in doing that are:
- In the Navigation pane, in the Tables group, double-click Customers to open the Customers table in Datasheet
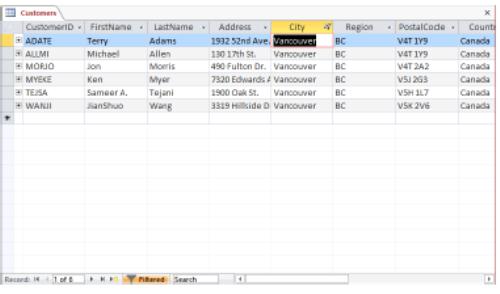
- In the City field, click any instance of Vancouver.
- On the Home tab, in the Sort & Filter group, click the Selection button, and then in the list, click Equals “Vancouver”. Notice that a small filter icon shaped like a funnel appears at the right end of the City field name to indicate that the table is filtered by that field. The record navigation bar at the bottom of the table changes to 1 of 6 because only six records have the value Vancouver in the City Also on the record navigation bar, the filter status changes to Filtered.

TIP In the list displayed when you click the arrow to the right of a field name (or the Filter button in the Sort & Filter group) are check boxes for all the unique entries in the active field. Clearing the Select All check box clears all the boxes, and you can then select the check boxes of any values you want to be displayed in the filtered table.
In the Sort & Filter group on the Home tab, the Toggle Filter button is now active. This button is dynamic; it is called Apply Filter and is inactive when no filter is applied, and it is called Remove Filter and is active when a filter is applied. Let’s use this button to quickly turn off the applied filter.
- In the Sort & Filter group, click the Remove Filter button to toggle off the filter and display all the records.
TIP If you click the Toggle Filter button again, the current filter will be reapplied.
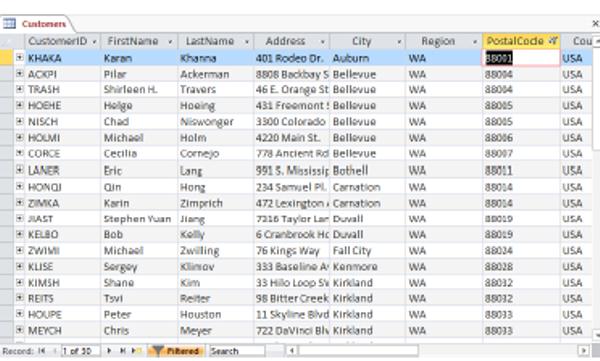
Now let’s display a list of all customers with postal codes starting with 880.
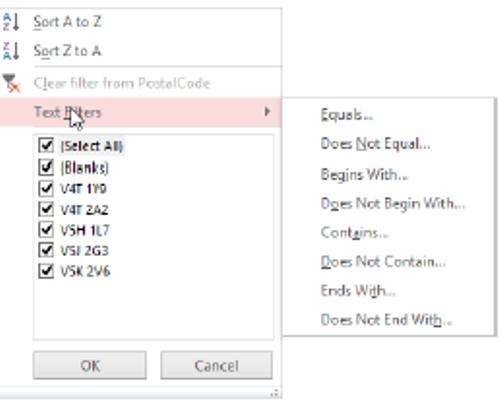
- Click the arrow to the right of the PostalCode field name, and point to Text Filters to display a list of criteria.

TIP The sort and filter options displayed when you click the arrow to the right of a field name (or when you click the Filter button in the Sort & Filter group) are determined by the data type of the field. The PostalCode field is assigned the Short Text data type to allow for ZIP+4 codes. If you display the sort and filter list for a field that is assigned the Number data type, the sort and filter list includes Number Filters instead of Text Filters, and different options are available.
- In the list, click Begins With to open the Custom Filter dialog box.

- In the PostalCode begins with box, enter 880. Then click OK to filter the table and display only the records that match your criteria.

- In the Sort & Filter group, click the Remove Filter button to turn off the filter and display all the records.
Now let’s display only the records of the customers who live outside of the United States.
- In the Country field, right-click any instance of USA, and then click Does Not Equal “USA” to display the records of all the customers from countries other than the United States (in this case, only Canada).
TIP If the text you want to base this filter on is buried in a large table, you can quickly locate it by clicking the Find button in the Find group on the Home tab, entering the term you want in the Find What box in the Find And Replace dialog box, and clicking Find Next. Then right-click the found text to apply the filter.
- Turn off the filter, and close the Customers table, clicking No when prompted to save your changes.
Finally, let’s filter a different table to create a list of orders placed with a selected employee on or after a specified date.
- Open the Orders table in Datasheet view.
- In the EmployeeID field, right-click Entin, Michael, and then click Equals “Entin, Michael”.
- With 19 records displayed in the filtered table, right-click 2/1/2012 in the OrderDate field, and then click On or After 2/1/2012 to find the six records that meet this criterion.
TIP To display a list of the available options for date filters, right-click any cell in the OrderDate field, and then point to Date Filters.
- Close the Orders table, clicking No when prompted to save the table layout.
Your questions are welcome.
Thank you.