AutoCAD 2023 now uses machine learning to help you learn about valuable tips and new features to work faster at the right time and in the right context.
AutoCAD 2023 System Requirement
- Operating System: 64-bit Windows 11 or 10 version 1809 or above
- Processor: 2.5 GHz (3+ GHz recommended), ARM processors not supported
- Memory: 8 GB (16GB recommended)
- Disk space: 10.0 GB
- Display: 1920 x 1080 resolution with True Color
Let’s dive right into the AutoCAD 2023
Performance Analyzer
AutoCAD performance can vary due to a variety of reasons which can include hardware and network configurations. The Performance Analyzer tool provides a meaningful way to understand various issues that might impact performance.
Performance issues can occur during the following operations but are not limited to:

- Opening the AutoCAD application or drawings
- Moving the mouse; slow, jumpy, or jerky cursor movement
- Switching layouts
- Plotting or printing layouts
- Starting a command
- Selecting objects
Sheet Set Manager Improvements (Web)
AutoCAD brings in additional capabilities to the Sheet Set Manager for Web.
In this release, the Sheet Set Manager for Web provides an easy access to create a sheet set in Autodesk Docs whether you’re using AutoCAD desktop or the AutoCAD web app.

Other key improvements in the Sheet Set Manager for Web include:
- Import layout to a cloud sheet set
- Rename and renumber sheets
- Automatic numbering option for new sheets
- Manage support files
- Add custom properties
Autodesk Assistant
A new AI-guided assistant is available in AutoCAD Help.
Note: The Autodesk Assistant is currently in beta and is only available for customers using English, German, or Japanese AutoCAD. You must access the product Help from within AutoCAD to use the Autodesk Assistant.
The Autodesk Assistant offers AI-guided self-service and options to contact support from within the product. Find solutions to product questions, engage in a 2-way chat with one of our product support agents, request an immediate callback, or create a support case.
How to Find Autodesk Assistant
The Autodesk Assistant is integrated into AutoCAD Help.
To access the Autodesk Assistant while in the product, press F1 or click the Help drop-down on the ribbon to open help. When help is active you can see a bubble notification in the lower right corner.

Click the icon to open the Autodesk Assistant.

Markup Import and Markup Assist
Markup Import and Markup Assist use machine learning to identify markups and provide a way to view and insert drawing revisions with less manual effort.
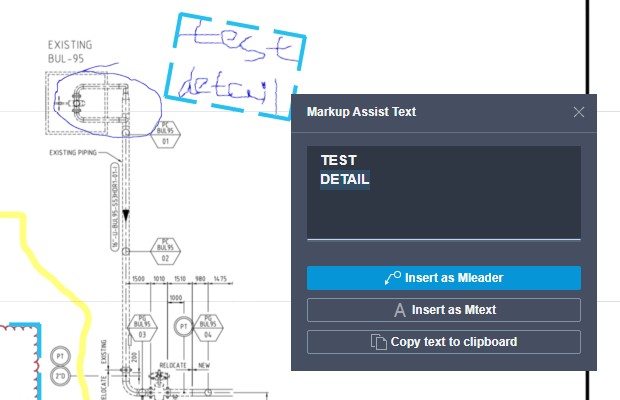
Markups can be imported as a PDF, PNG, or JPG and are overlaid on top of your drawing in the Trace workspace. Markups in the imported file are automatically identified as mtext, mleaders, and revision clouds. Markup Assist lets you insert those identified markups into the drawing as geometry.
Markup Import
Use Markup Import to place a marked-up version of your drawing on top of the original file to make it easier to view and incorporate changes to your drawing. For example, if you have a PDF version of your drawing that has text and revision notes added, use Markup Import to overlay the revised drawing on top of the original. Or, if you have a printed version of your drawing that contains hand-written revision notes, you can take a photograph of the printed version and then import it as a JPG or PNG.
The imported file is automatically placed and aligned on top the drawing file in a new trace. If the imported file is not aligned correctly, you can manually align, move, scale, or rotate the imported file.
When viewing imported markups, you can change the background transparency to adjust the visibility of the imported markup.

Markup Assist
Markup Assist automatically identifies markups as text, leaders, and revision clouds. Click an identified markup, then insert it as an mtext, mleader, or revcould object. You can edit the text before inserting it, or choose to copy the text to the clipboard.
To Import a Markup
- Click Collaborate Tab > Traces Panel > Markup Import.
Select a PDF, PNG, or JPG markup file to import.
The markup file can be a digital copy, a photograph, or a scanned version of the original drawing. Move, align, rotate, or scale the markup if the imported markup file isn’t automatically aligned to the drawing correctly.

To Use Markup Assist
After importing a markup, with the trace open, turn on TRACEBACK and MARKUPASSISTMODE

Click an identified markup.

If the identified markup is text, choose to insert the object as mtext, as an mleader, or copy the text to the clipboard. You can edit the text before inserting it.

Inserting the object adds it to the drawing as geometry. If the markup object is identified as a revision cloud, you can insert it as a revcloud.
