
Patterns in PowerPoint are two-color designs comprising lines, dots, dashes and checks. PowerPoint includes 48 patterns such patterns with names like plaid, weaves, shingle and zig zag.
If you are a PowerPoint old-timer, you will remember that Microsoft removed this option in PowerPoint 2007 although it existed in PowerPoint 2003 and previous versions. With PowerPoint 2010, they bring back this option but they have buried it in a dialog box rather than including it within the Shape Fill gallery.
Follow these steps to change or apply a pattern fill to a shape:
- Select the shape(s) that you want to fill with a pattern. Alternatively, if you just want to follow this tutorial step-by-step, launch PowerPoint. Most of the time, PowerPoint will open with a new slide in a presentation, PowerPoint 2010 users can change the slide layout to Blank by selecting Home tab | Layout | Blank.
- Within the Home or Insert tab of the Ribbon, choose the Shapes button to view the Shapes gallery that you can see in Figure 1. Select any shape, and then either drag and draw, or click once on the blank slide to place an instance of the shape (we used a heart shape as you can see later in Figure 2).

3. Right click the shape, and from the context menu that appears, choose the Format Shape option as shown in Figure 2.

4. This opens the Format Shape dialog box. Make sure that the Fill tab is selected, then click the radio button for Pattern fill (refer to Figure 3 below). Now you can see a pattern gallery on the lower half of the Format Shape dialog box shown in Figure 3.
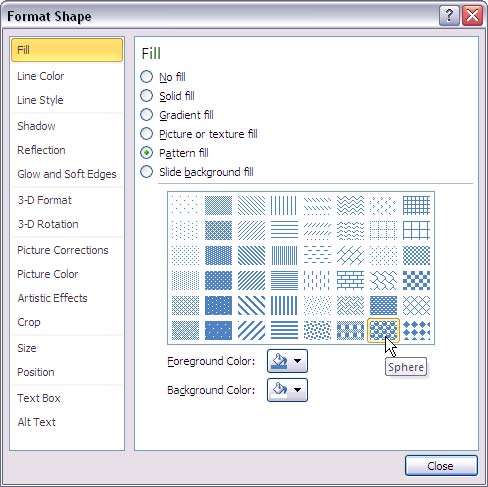
5. Choose any of the pattern styles. Figure 3 above shows that we selected the pattern named Sphere. You can select any pattern all the way from 5% to Solid diamonds depending on your need.
Whichever pattern you choose, you can then change the foreground and background colors for the pattern using the Foreground Color and Background Color buttons that you can see in Figure 3 above. When you click any of these buttons you can see the drop-down Colors gallery as shown in Figure 4 below.
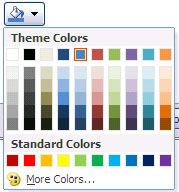
This gallery will work in the same way as it does for solid fills. If you don’t want to change the foreground and background colors, just accept the default color values that PowerPoint uses.
6. Once the pattern is selected and colors are changed, click the Close button in the Format Shape dialog box (see Figure 3) to apply the pattern to the selected shape(s). In Figure 5 below, you can see the previously selected heart shape with an added pattern fill.

Remember to save your presentation often