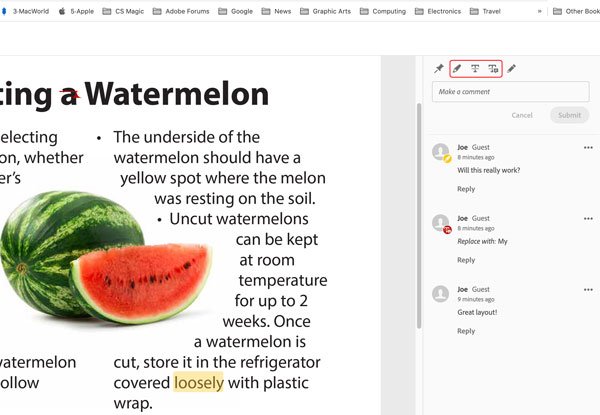
Most importantly, InDesign 2021 adds three badly-needed new text annotations to the web review interface: Reviewers can now markup text with new Highlight Text, Strikethrough Text, and Replace Text tools (Figure 1). Performing any of these actions will leave a corresponding comment or add your notes in conjunction with the annotation.
Figure 1
After these annotations are added and synced to InDesign, the markup appears in your InDesign layout when Show Annotations is turned on (Figure 2). The three types of annotations also appear in the Review panel with similar options to the other annotations.

Figure 2
Sadly, what didn’t make it into this release is an Accept button which would execute these changes in the document. (The PDF Comments panel can currently do this.) We’re told that this feature is in the roadmap for later updates to the Share for Review feature. In the meantime, as a workaround, you’ll just need to review the comments, manually make the edits, and mark each comment as Resolved.
Easier library sharing
The CC Libraries panel has new features that make it easier to share content and resources with other users and to browse shared libraries. You will need to update your copy of the Adobe Creative Cloud desktop app to version 5.3.0.438 or later to see these improvements.
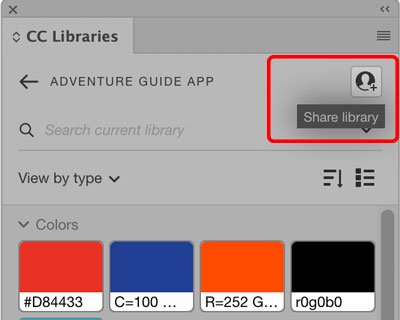
When InDesign displays a library in the CC Libraries panel, a new Share Library button appears at the upper right (Figure 3). Clicking it switches to the Adobe Creative Cloud desktop app window and opens a dialog box where you can initiate an invitation to share the library—a much more efficient workflow than in the past.
Figure 3
When you’re viewing all your libraries, the bottom of the CC Libraries panel now offers options to Browse Shared Libraries (libraries you’re sharing with other users) or to go to public libraries (Figure 4). You can save public libraries into your personal libraries, and you can use assets from these libraries for your creative projects from any device.
Figure 4
Coming cloud services
While Adobe has been somewhat tight-lipped about future features, it’s clear that they’re set on offering more cloud-based features. For example, you can imagine possible future directions for InDesign if you observe how Photoshop and Illustrator have developed in their 2020 and 2021 versions. These apps can now store their files in the Adobe Creative Cloud, which then gives you additional capabilities: Cloud files can be shared between multiple devices, you can track a document’s version history and revert to an earlier version if necessary, and various forms of file sharing become available. I hope to see all these options come to InDesign in the coming months or years.
Subject-Aware Text Wrap
Subject-Aware Text Wrap is a machine-learning feature that identifies the prominent subject inside an image and creates a text wrap around that subject. This was possible previously using the Detect Edges feature in the Text Wrap panel, but only when the background was white or transparent. The Subject-Aware Text Wrap feature is better because it works for any image that has a clear foreground and background, and can be particularly useful when the image doesn’t already include a path or alpha channel. However, this is currently an automatic process without user controls, so the more clearly defined the subject is, the better it works (Figure 5).
Figure 5
Here are the steps to create subject-aware text wrapping:
- Open the Text Wrap panel.
- Place a text frame with a story in it over an image that has a prominent subject. It helps to have the subject on a high-contrast background.
- While the image is selected, click the Wrap Around Object Shape button in the Text Wrap panel.
- In the Contour Options Type menu (in the panel), choose Select Subject.
- Modify the offset value as desired.
Because the process is automatic, if you resize the image, the wrap will be recalculated just like using the Detect Edges option. As with similar wraps, you can use the Direct Selection tool to modify individual anchor points—which then freezes the wrap shape, as it becomes a user-modified path.
New Color Features
There are a few other features besides those that are based on the cloud or machine learning, but the list this year is definitely underwhelming.
Adobe did add two of the most requested color features at the InDesign User Voice website to InDesign 2021. You can now locate and change all the occurrences of a specific color in a document or in all open documents. Plus, you can also now create, edit, and apply HSB (Hue-Saturation-Brightness) swatches in InDesign.
Locate colors
In the past, it was not easy to find where named colors were located in a document. Now you can search for the location of colors in fills and strokes for text and objects, including table cells, and change them.
The easiest way to start is in the Swatches panel: Right-click any color swatch in the panel and choose Find This Color. InDesign will then open the Find/Change dialog box with the new Color tab displayed and the color pre-selected in the Find Color menu (Figure 6).

Figure 6
Note that you can choose a tint range of that swatch to search. For example, you can type 0%–50% in the Tint Range field if you only want to find instances where the color is set at less than 50%.
You can also choose the range of the search (Document or All Documents) and the type of objects to search (All Frames or Text, Graphic, or Unassigned). When the search begins, each instance of the object containing the swatch color will be highlighted in the layout and identified in the dialog box—for instance, it might say, “Used in Text: Fill.”
The feature can find colors, tints, and gradients. It will even display unnamed colors that you used in your document but haven’t yet created a swatch for. When replacing colors, you can select a swatch or create a new one.
However, there are two important gotchas to watch out for with this feature. First, InDesign can find only spot colors inside placed graphics (such as Pantone inks); it cannot find RGB or CMYK colors inside artwork you’ve imported. And even though it can find spot colors inside artwork (such as an EPS or PDF file), it cannot change those colors.
Second, the Find/Change dialog box cannot currently change colors inside styles, so if you use it to change colors, you may be applying manual overrides to your text or objects. For example, let’s say you have a heading paragraph style that is blue, and then you can use Find/Change to change all instances of that blue to pink. The paragraph style will still be defined with blue, and your headings will appear pink because of a style override. Perhaps in the future, Adobe will add an option to change styles when changing all (similar to that option in the Find/Replace Fonts dialog box).
Create, edit and, apply HSB colors
Technically, HSB is not really a color space, like RGB or CMYK. Rather, it’s a representation of RGB color using three axes which are more intuitive for most graphic designers to work with—hue, saturation, and brightness.
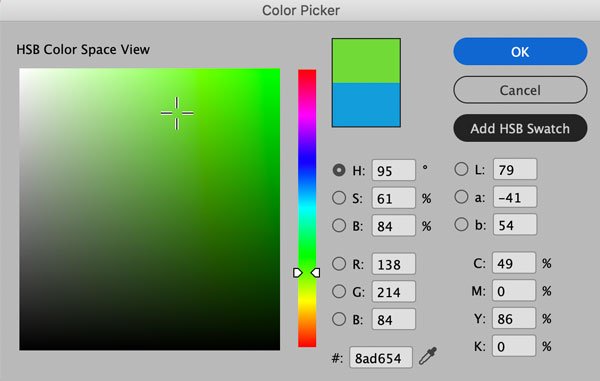
You can now create HSB swatches with the Swatches and Color panels, and in the Color Picker. In the Swatches panel, choose Color Type: Process and Color Mode: HSB (Figure 7).
Figure 7
Tip: you may need to scroll up to see it! In the Color panel, choose HSB sliders in the panel menu. To use the Color Picker, double-click the Fill or Stroke swatch in the Tools panel (or Color panel), and then select the H, S, or B field. You can choose HSB values visually with the color slider and the color field, or enter in the HSB numeric fields; when you’re done, click OK or Add HSB Swatch (Figure 8).
Figure 8
HSB support in preflight
Even though all HSB colors are technically just RGB colors (and are treated as such when printing or exporting), HSB is now a supported option in a Preflight profile. That means you can choose HSB in Color > Color Space Not Allowed. When that’s enabled, HSB colors will be detected, and the error reported.
Focus on Stability and Reliability
Over the past year, the InDesign team has focused a lot of attention on improving stability and reliability in the program. To this end, the team fixed more than 100 bugs throughout the year. The engineers report that they have dramatically reduced document corruption and crash rates.
Recovery service for damaged files
For several years, the InDesign team has been working on enhancing their ability to recover damaged files, as well as preventing internal corruption. The effort has been a long one because there are multiple factors, both internal and external to the InDesign application, that can lead to document corruption.
Adobe has created a recovery service for damaged InDesign files. This new service will work with InDesign 2021 and later. The engineers have incorporated some mechanisms to detect if a document is damaged and to try to repair it. When a damaged file is detected, InDesign will ask you if you would like to proceed with the recovery of the file. If you agree, your file will be temporarily uploaded to an Adobe server for processing. On successful repair, the recovered version of your document will be downloaded again, InDesign will open it, and you’ll be prompted to save it before proceeding (Figures 9 and 10).

Figure 9

Figure 10
Copy Editor Beta
In the August release of InDesign 2020 (version 15.1.2), Adobe added a somewhat mysterious feature called Copy Editor (Beta). This is an experimental feature designed to help when you experience a significant lag while typing. Such a lag may become evident when you deal with a lot of text in the document or when certain additional features (for example, footnotes and spanning heads) are enabled in the application.
The beta test of this feature is continuing in InDesign 2021. If it is available to you, you can launch it by choosing Edit > Edit in Copy Editor (Beta). A Copy Editor (Beta) window appears (Figure 11) where you can continue to enter text to avoid any lag. When you’re finished adding text, click Done.

Figure 11
Copy Editor may sound similar to the Story Editor feature, which has been a part of InDesign for 20 years, but it’s actually far more rudimentary. For example, you have to close the “modal” Copy Editor window to go back to your document. Plus the Copy Editor is text only and does not support formatting and styles. Many people (including the staff of this magazine) have wondered aloud why Adobe is even experimenting with this.
Note that you may not have the option to use Copy Editor (Beta) even after you update to InDesign 2021 because it is an experimental feature that is available in limited locations and for a limited number of users.

Interesting
great for beginner